No exercise builds the leg muscles like squats do. You can lunge, bike, run and leg press all day. But nothing will give you strong, powerful legs faster than barbell squats. If you’re not squatting, you’re not maximizing your lower body strength.

Unfortunately, low back pain after squats is a common occurrence. Squats stress the lumbar spine structures. This sometimes leads to back pain.
The good news is that low back pain rarely indicates anything serious is going on. In fact, acute low back pain isn’t a serious medical problem 99.1% of the time (1).
This article describes the 3 common causes of back pain after squats, along with simple strategies to reduce pain.
1) Bad Form
Subpar squatting form is a frequent source of low back pain. Squatting with poor technique can strain the lower back and cause pain. These 3 squat technique flaws can create low back pain.
Good Morning Squat
This technique flaw usually affects back squats–a good morning pattern on front squats would make the bar fall forward off the lifter’s shoulders.
The good morning pattern occurs when the hips shoot up as the lifter begins lifting the weight upward from the bottom of the squat.

The squat descent looks normal, but as soon as the lifter transitions to the concentric (raising) portion of lift, their hips shoot skyward, knees move backwards, and trunk tips forward. This technique flaw creates significant shear force on the lumbar spine.
So why does it happen, and how can you fix it?
In simple terms, the good morning squat occurs because the hip extensors (glutes, adductors, and lower back muscles) are stronger than the knee extensors (quadriceps).
The good morning move positions the knee joints underneath the bar and the hips joints further away from the bar. Essentially, it makes the lift easier for the quadriceps muscles and harder for the glutes and low back muscles.
Is normal to see a slight good morning pattern, even in elite lifters, with near-maximal weights. However, if it’s creating lower back pain, technique adjustments may be warranted.
There are several fixes for a good morning squat.
First, video your lifts from the side. Video is a great way to visualize your technique and make adjustments. It’s an excellent source of unbiased feedback.
Pay particular attention to your knees. If they slide backwards at the bottom of the squat, your trunk will tip forward, producing a good morning squat.
Second, keep your knees forward out of the bottom of the squat. If the knees stay forward, the hips can’t shoot up.
Third, lighten your load. Use correct form during your warm ups and working sets to break bad habits. Select light loads and perform lots of repetitions to ingrain good form.
Finally, lean more forward when you squat. The good morning squat is your body’s way of telling you it wants to lift with the hips and back muscles.
Instead of fighting your anatomy, consider switching to a low bar squat and inclining your trunk angle more forward when you lift. As a bonus, you will probably squat more weight with a low bar position than with a high bar style (2).
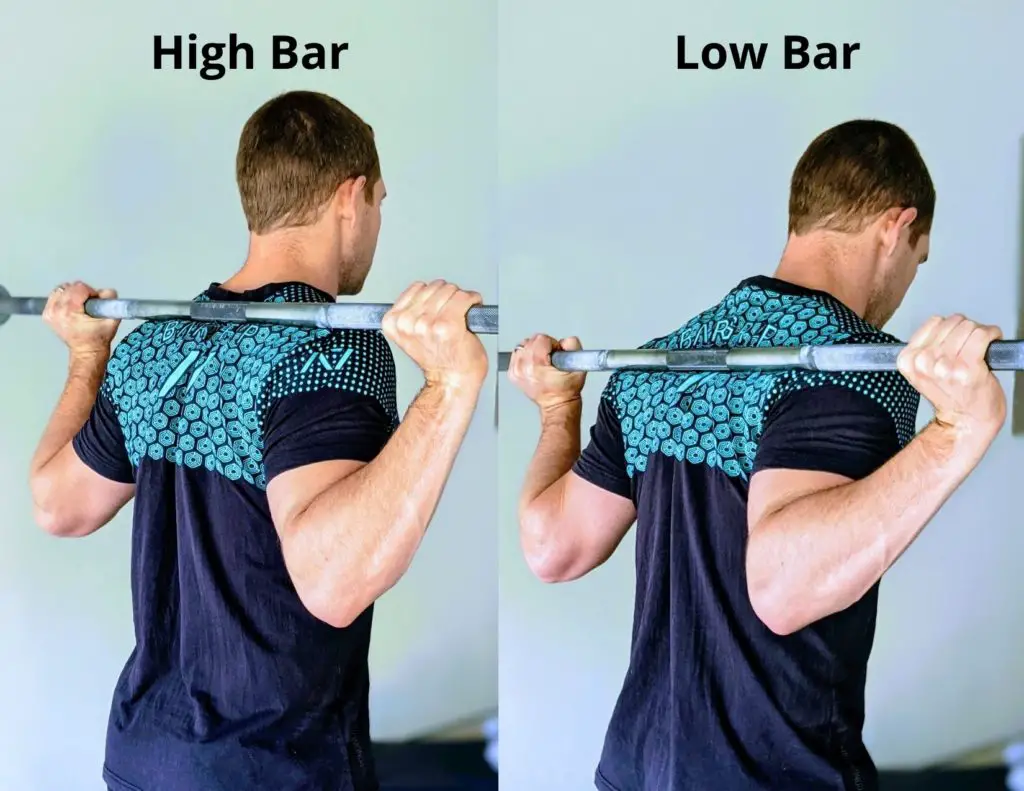
The low bar style of squatting was popularized by Mark Rippetoe. Check out his explanation of low bar technique in this video:
For more from “Coach Rip,” check out his Starting Strength book.
Poor Spinal Posture
Squat technique flaw #2 is poor posture. What comes to mind when you imagine poor posture in the squat? Probably a lifter with a flexed spine who looks like they slouch at a desk all day. Maybe like this:

While that’s not an ideal squatting posture, I usually see lifters make a different posture mistake. Too often, athletes lift with their back overextended. I call this the “Chest Up” flaw.
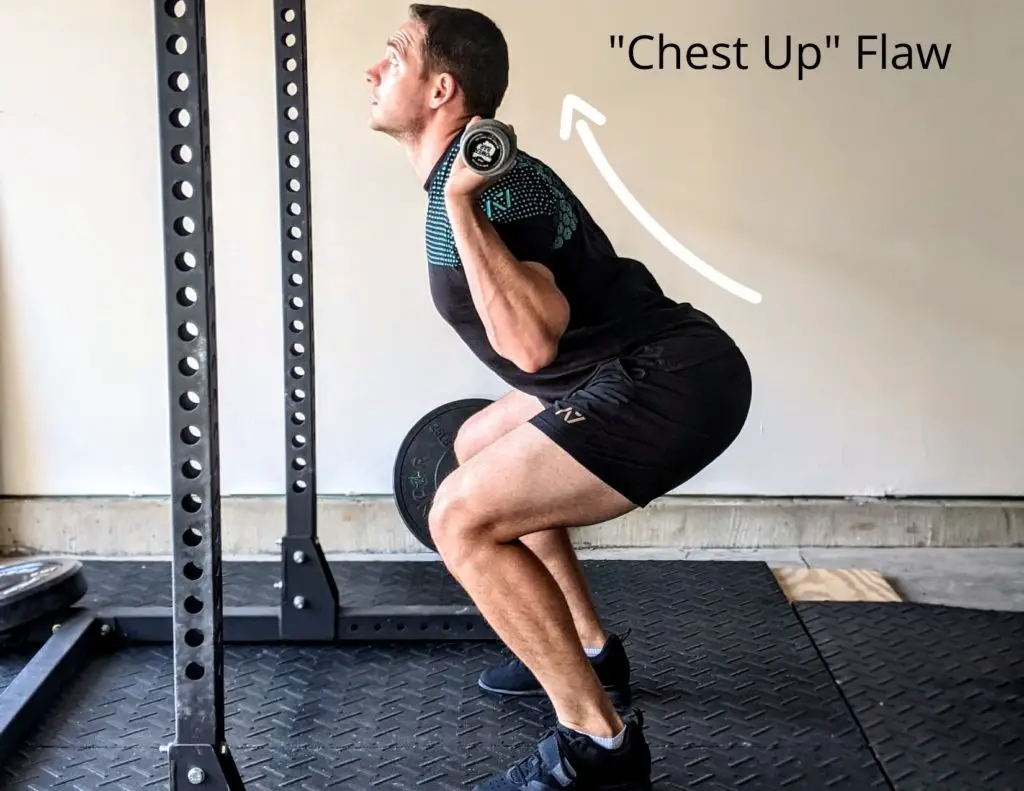
“Chest up” is a bad squat cue. So is “look up.” Most lifters take it too far and end up squatting with an extended lumbar spine.
Squatting too extended can lead to three outcomes:
First, a lifter will stop the lift above parallel because they can’t maintain this position any deeper into the squat. Squatting too high makes the lift easier and confers fewer strength and muscle size benefits.
Second, a lifter will keep their chest up until the bottom of the squat. Then, their ankle mobility runs out, forcing their trunk to tilt forward. This kind of squat looks similar to the good morning squat discussed above.
Third, the lifter will squat deep and have a noticeable “butt wink” at the bottom of the lift, with the tailbone tucking between the legs. (More on butt wink in the next section.)
The fix for poor spine position is simple. Squat with a more neutral spine. Try these 3 cues to squat with better posture:
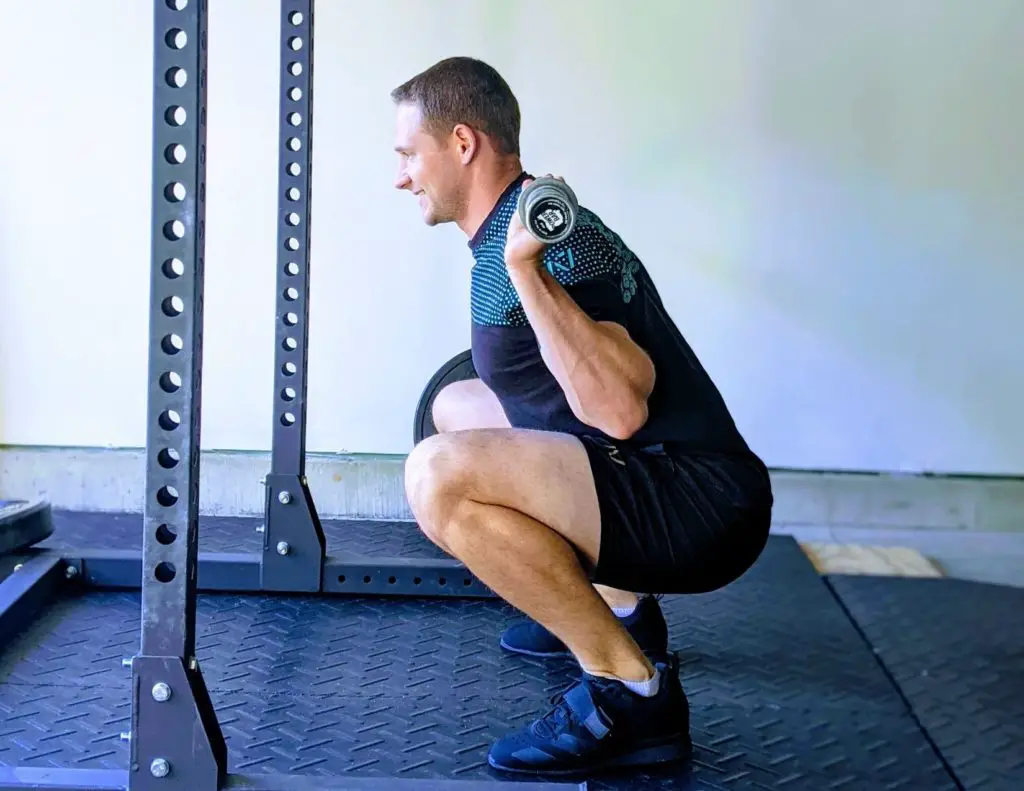
1) Look Forward and Down
If you’re low bar squatting, burn a hole with your eyes 3 ft in front of your feet. If you’re using high bar or front squat technique, look slightly down or straight ahead of you. The rest of your spine will follow your eyes and neck.
Notice my neutral head and neck position with this high bar squat:
2) Squeeze the Glutes at the Top
Tightening the butt cheeks before you squat creates a posterior pelvic tilt (PPT). PPT puts the lumbar spine in a neutral position. It’s virtually impossible to overextend the back when your pelvis is tilted posteriorly.
3) Video Your Technique
It’s a good idea to compare your spine posture to a good squatter with similar proportions. Lifters with short legs, like Russwole, stay very upright when they squat:
Long-legged lifters like David Woolson squat with more forward trunk lean:
“Know thyself” and emulate a good lifter with similar proportions to yours. You’ll be hitting squat PRs in no time!
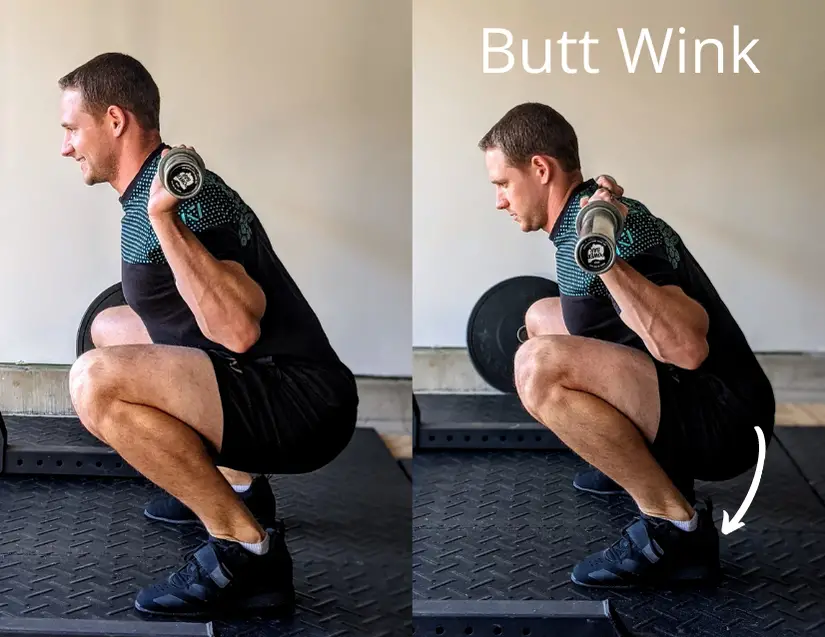
Butt Wink
The dreaded butt wink is squat flaw #3 that can cause low back pain.
Butt wink occurs at the bottom of the squat, when the pelvis posteriorly tilts and the tailbone tucks between the legs.
Many people think tight hamstrings cause butt wink. They are wrong.
The hamstrings are biarticular muscles, crossing both the knee and the hip joints. The hamstrings bend (flex) the knee and extend (straighten) the hip.
To lengthen the hamstrings, you need to flex the hip and extend the knee. During a squat, the hamstrings are lengthened at the hip, because the hip is flexed. The hamstrings-cause-butt-wink idea sounds good so far.
But the theory runs into problems at the knee. Butt wink occurs when the knees are flexed at the bottom of a squat. The hamstrings are shortened with knee flexion.
To recap, the hamstrings don’t change length much during a squat. They lengthen at the hip and shorten at the knee. Therefore, they don’t cause butt wink. Yet another reason you don’t need to stretch your hamstrings.
So if it’s not the hamstrings, what causes butt wink?
The hip joints are the main culprit. At the bottom of deep squats, especially for lifters with limited hip flexion or an anteriorly tilted pelvis, the femurs (upper leg bones) run into the rim of the acetabulum (hip socket).
When these bones meet, neither one budges, so the pelvis is forced into a butt wink position. A butt wink means the lower back flexes (bends forward), a position that can irritate the lumbar discs and cause lower back discomfort.
Is butt wink a problem?
It depends. Many elite squatters lift over 500 lbs pain-free, despite a little butt wink at the bottom of the squat. It’s not necessarily a problem. However, for people with sensitive lumbar spines, squatting with a large butt wink can aggravate low back pain.
How do you fix butt wink?
Try these 4 tips to reduce butt wink:
First, squeeze your glutes before you squat. Contracting the glutes posteriorly tilts the pelvis. This will improve your spine position and you’ll be able to squat deeper with less butt wink–especially if you tend to squat with your lower back too extended.
Second, adjust your stance width. An excessively wide or narrow stance width increases the chances of butt wink.
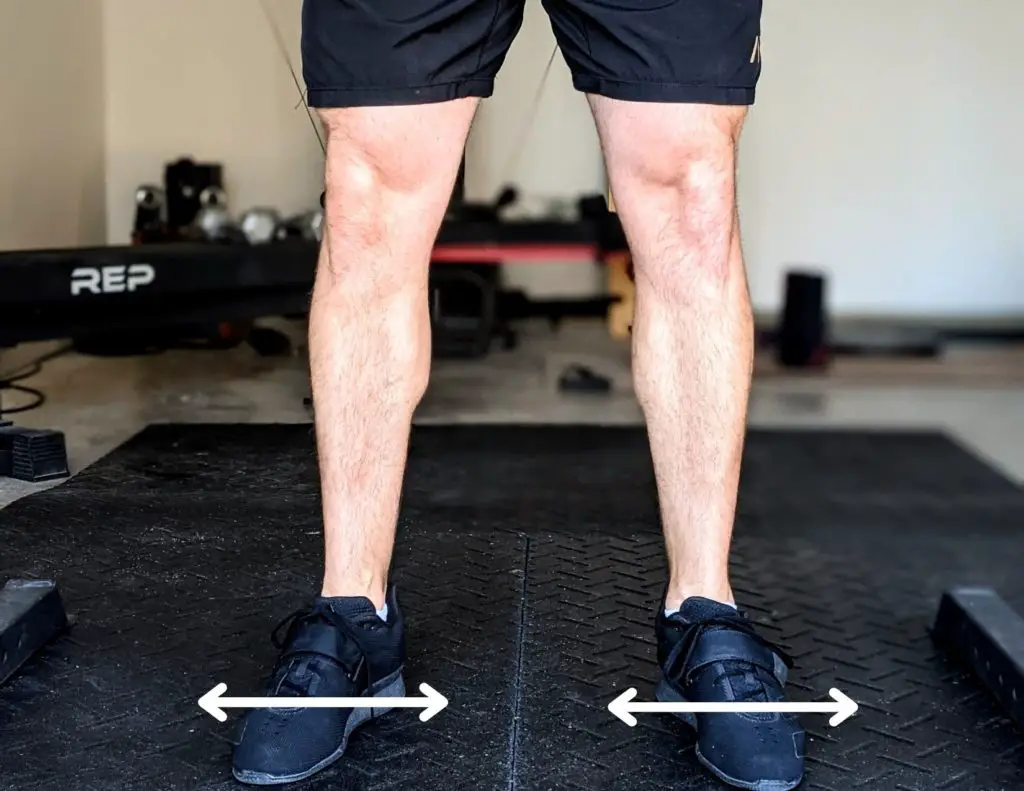
Find a comfortable stance width that allows you to squat deep most comfortably.
Third, fix poor hip mobility. Try this banded hip flexion stretch to unlock a tight hip joint. Use a sturdy resistance band for this mobilization.
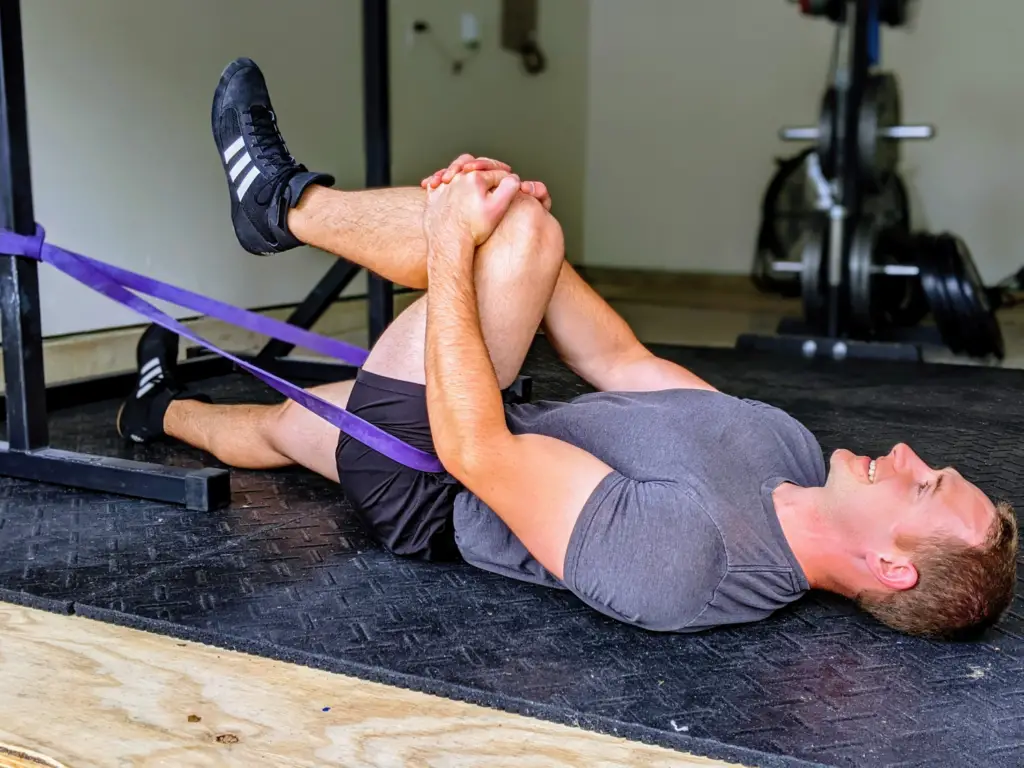
This technique creates an inferior glide of the femur on the acetabulum, which improves hip flexion.
Finally, video your squats for the side. If you’re not doing this, you’re missing out. Recording your lifts is the fastest route to improvement since it gives you immediate, objective feedback.
Bad squatting form is a common cause of back pain. So is a haphazard, YOLO training approach–aka lifting too heavy.
2) Lifting Too Heavy
It’s one thing to feel lower back soreness the next day after a heavy squat session–delayed onset muscle soreness is normal after weight training. It’s another thing to struggle to climb the stairs for a week after squatting heavy.
Heavy squats are not inherently dangerous (3).
But squatting more weight than you’ve trained your body to handle is a recipe for tweaking your lower back or developing knee pain.
Doing too much, too fast is an easy way to get injured.
Most well-designed lifting programs have an introductory week that involves lighter weights and less volume. This intro week is designed to make the body adapt to training without creating too much soreness, pain, or risk of injury. It’s a springboard for a heavier workload in the coming weeks.
A smart training program solves this type of lower back pain. Going to the gym without a plan and trying to hit a squat PR every week is a recipe for injury, plateau and frustration.
Instead, throttle back the intensity and take a few weeks off heavy barbell squats. You can also try a squat variation that feels more comfortable–perhaps a goblet squat or a box squat. Or, simply use less weight and aim to perfect your squat form.
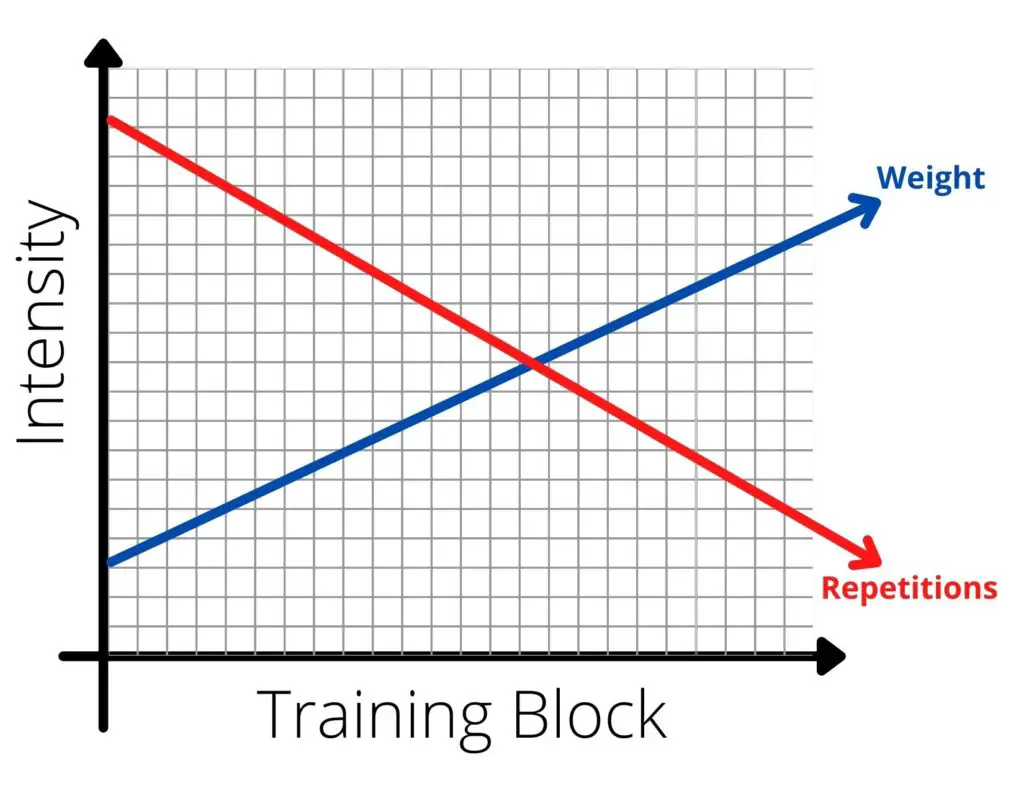
The best training plans ramp up lifting intensity and weight. This approach is called linear periodization and it’s embedded into virtually all successful training programs. Over the course of several weeks, known as a training block, repetitions decrease and weight on the bar increases.
To learn more about how to structure your training sessions for maximum gains, check out The Muscle and Strength Pyramid:
3) Core Weakness
The core gets blamed for a lot of low back pain. But back pain is not the unavoidable result of core weakness. In fact, plenty of research indicates that a weak core has very little to do with low back pain (4).
However, when it comes to squats, the inability to effectively brace and stabilize the spine can lead to pain. It works like this:
Pain is our body’s alarm system. If the brain senses the spine-stabilizing muscles aren’t doing their job, then 315 lbs is loaded on top of the spine, what do you think will happen? Pain, guarding, and muscle tightness are the predictable results.
Core weakness often contributes to back pain in hypermobile people–those who are extra flexible and have stretchier connective tissue (5). The people who can touch their toes effortlessly, pop their joints out of place, and consider themselves “double jointed.”
Solid core control will help you squat more weight with better form. Here’s how:
Imagine firing a cannon off a slab of concrete. It’s a stable foundation, so you’re going to be accurate and launch the cannon ball a long way. Now imagine firing a cannon from a canoe. The foundation isn’t stable, so your aim and force production will be inconsistent and unpredictable.
Squatting with poor bracing and core weakness is like firing a cannon from a canoe–you’re trying to produce a lot of force off a shaky foundation. And it probably won’t go so well.
Try these four exercises to improve your core stability when you squat.
Heel Digs
This exercise targets the lumbar multifidus muscles, small spinal stabilizers that control motion between spinal segments. It’s a great way to reduce the risk of future injury. It’s best for mild to moderate pain–not a first-priority exercise for acute back pain or sciatica.
Lie on your back with both knees bent and your feet flat on the ground. Use your hands to feel the lumbar multifidus muscles next to your spine, a fingerbreadth from the bony spinous process in the middle of your spine.
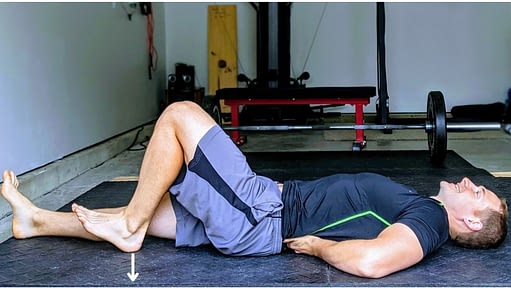
Pull your left heel down into the floor, like you’re trying to dig a hole in the ground. You should feel the back muscles tighten under your fingers (especially on the right side). Repeat with the opposite leg.
Since the lumbar multifidus is an endurance muscle, train it for endurance–hold contractions 10-15 seconds for 10-20 repetitions.
Bird Dogs
This popular exercise also engages the spinal stabilizers and demands excellent core control. Make sure you keep your spine in a neutral position.
People naturally arch the lower back too much with this exercise. This makes the exercise easier by relying on passive structures for stability, instead of the core muscles.

Lift one arm and the opposite leg. Keep your pelvis stable. Repeat on the other side. Perform in a controlled fashion for maximum benefits.
Aim for 10-20 slow, controlled repetitions on each side.
Pause Squats
The exercise emphasizes control at the bottom of the squat. This is where technique can crumble during the lift–like with the good morning and butt wink squat flaws.
Start with light weight and work on a 10-20 second hold, maintaining tension the whole time.

As you feel more comfortable, add weight and reduce the hold time. Since this is an exercise to refine technique, make sure to use exquisite form during your pause squats.
Wear a Belt
Weightlifting belts won’t necessarily prevent injury. They do allow you to brace your core harder, create more intra-abdominal pressure, and lift more weight.

And don’t worry about your core muscles getting weak if you use a belt. That’s a myth. The rectus abdominis (six pack muscle) works a bit harder when you use a belt, while the external obliques work just a little bit less (6).
Looking for a belt? Check out this highly-rated, budget-friendly lifting belt on Amazon.
Wrapping Up
Lower back pain from squats comes from several sources. It’s caused by lifting with bad form, poor programming, or core weakness.
If you’re dealing with low back pain, physical therapy is your best option. Working with a physical therapist is proven to get you feeling better faster than seeing your primary care doctor or a spine specialist first (7).
Ultimately, that means getting back into the gym sooner.
For more recovery insights you won’t find anywhere else, join the free, fast-growing Facts & Physio Newsletter. Plus, get The Recovery Checklist when you sign up.